Mutators
Writing Data
Mutators are how you write data with Zero. Here's a simple example:
// src/mutators.ts
import {defineMutators, defineMutator} from '@rocicorp/zero'
import {z} from 'zod'
export const mutators = defineMutators({
updateIssue: defineMutator(
z.object({
id: z.string(),
title: z.string()
}),
async ({tx, args: {id, title}}) => {
if (title.length > 100) {
throw new Error(`Title is too long`)
}
await tx.mutate.issue.update({
id,
title
})
}
)
})Architecture
A copy of each mutator exists on both the client and on your server:
Often the implementations will be the same, and you can just share their code. This is easy with full-stack frameworks like TanStack Start or Next.js.
But the implementations don't have to be the same, or even compute the same result. For example, the server can add extra checks to enforce permissions, or send notifications or interact with other systems.
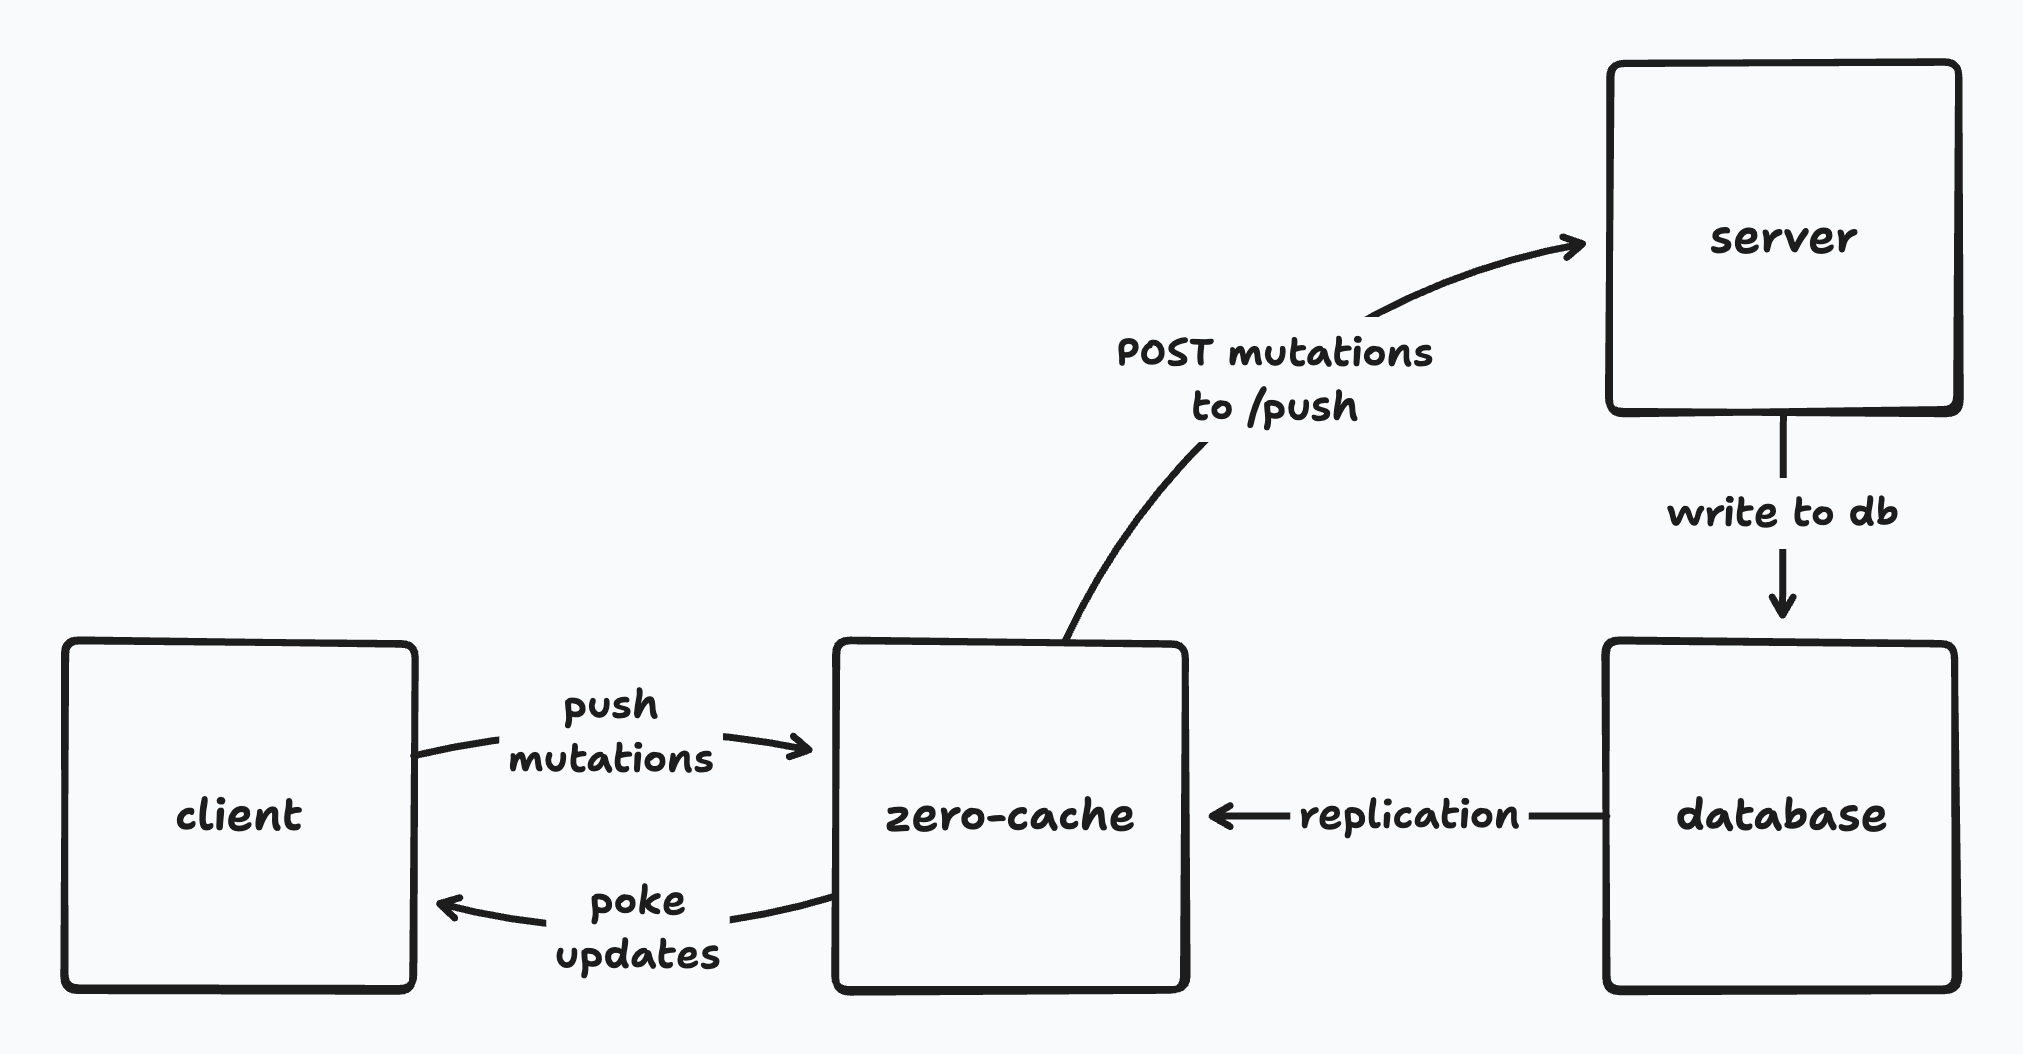
Life of a Mutation
When a mutator is invoked, it initially runs on the client, against the client-side datastore. Any changes are immediately applied to open queries and the user sees the changes.
In the background, Zero sends a mutation (a record of the mutator having run with certain arguments) to your server's push endpoint. Your push endpoint runs the push protocol, executing the server-side mutator in a transaction against your database and recording the fact that the mutation ran. The @rocicorp/zero package contains utilities to make it easy to implement this endpoint in TypeScript.
The changes to the database are then replicated to zero-cache using logical replication. zero-cache calculates the updates to active queries and sends rows that have changed to each client. It also sends information about the mutations that have been applied to the database.
Clients receive row updates and apply them to their local cache. Any pending mutations which have been applied to the server have their local effects rolled back. Client-side queries are updated and the user sees the changes.
Defining Mutators
Basics
Create a mutator using defineMutator.
The only required argument is a MutatorFn, which must be async:
import {defineMutator} from '@rocicorp/zero'
const myMutator = defineMutator(async () => {
// ...
})Writing Data
The MutatorFn receives a tx parameter which can be used to write data with a CRUD-style API. Each table in your Zero schema has a corresponding field on tx.mutate:
const myMutator = defineMutator(async ({tx}) => {
// This is here because there's a `user` table in your schema.
await tx.mutate.user.insert(...)
})Insert
Create new records with insert:
tx.mutate.user.insert({
id: 'user-123',
username: 'sam',
language: 'js'
})Optional fields can be set to null to explicitly set the new field to null. They can also be set to undefined to take the default value (which is often null but can also be some generated value server-side):
// Sets language to `null` specifically
tx.mutate.user.insert({
id: 'user-123',
username: 'sam',
language: null
})
// Sets language to the default server-side value.
// Could be null, or some generated or constant default value too.
tx.mutate.user.insert({
id: 'user-123',
username: 'sam'
})
// Same as above
tx.mutate.user.insert({
id: 'user-123',
username: 'sam',
language: undefined
})Upsert
Create new records or update existing ones with upsert:
tx.mutate.user.upsert({
id: samID,
username: 'sam',
language: 'ts'
})upsert supports the same null / undefined semantics for optional fields that insert does (see above).
Update
Update an existing record. Does nothing if the specified record (by PK) does not exist.
You can pass a partial object, leaving fields out that you don’t want to change. For example here we leave the username the same:
// Leaves username field to previous value.
tx.mutate.user.update({
id: samID,
language: 'golang'
})
// Same as above
tx.mutate.user.update({
id: samID,
username: undefined,
language: 'haskell'
})
// Reset language field to `null`
tx.mutate.user.update({
id: samID,
language: null
})Delete
Delete an existing record. Does nothing if specified record does not exist.
tx.mutate.user.delete({
id: samID
})Arguments
The MutatorFn can take a single args parameter. To enable this, pass a validator to defineMutator:
import {defineMutator} from '@rocicorp/zero'
const initStats = defineMutator(
z.object({issueCount: z.number()}),
async ({tx, args: {issueCount}}) => {
if (issueCount < 0) {
throw new Error(`issueCount cannot be negative`)
}
await tx.mutate.stats.insert({
id: 'global',
issueCount
})
}
)We use Zod in these examples, but you can use any validation library that implements Standard Schema.
Reading Data
You can read data within a mutator by passing ZQL to tx.run:
const updateIssue = defineMutator(
z.object({id: z.string(), title: z.string()}),
async ({tx, args: {id, title}}) => {
const issue = await tx.run(
zql.issue.where('id', id).one()
)
if (issue?.status === 'closed') {
throw new Error(`Cannot update closed issue`)
}
await tx.mutate.issue.update({
id,
title
})
}
)You have the full power of ZQL at your disposal, including relationships, filters, ordering, and limits.
Reads and writes within a mutator are transactional, meaning that the datastore is guaranteed to not change while your mutator is running. And if the mutator throws, the entire mutation is rolled back.
Context
Mutator parameters are supplied by the client application and passed to the server automatically by Zero. This makes them unsuitable for credentials, since the user could modify them.
For this reason, Zero mutators also support the concept of a context object.
Access your context with the ctx parameter to your mutator:
const createIssue = defineMutator(
z.object({id: z.string(), title: z.string()}),
async ({tx, ctx: {userID}, args: {id, title}}) => {
// Note: User cannot control ctx.userID, so this
// enforces authorship of created issue.
await tx.mutate.issue.insert({
id,
title,
authorID: userID
})
}
)Mutator Registries
The result of defineMutator is a MutatorDefinition. By itself this isn't super useful. You need to register it using defineMutators:
export const mutators = defineMutators({
issue: {
update: updateIssue
}
})Typically these are done together in one step:
export const mutators = defineMutators({
issue: {
update: defineMutator(
z.object({id: z.string(), title: z.string()}),
async ({tx, args: {id, title}}) => {
await tx.mutate.issue.update({
id,
title
})
}
)
}
})The result of defineMutators is called a MutatorRegistry. Each field in the registry is a callable Mutator that you can use to perform mutations:
import {mutators} from 'mutators.ts'
zero.mutate(
mutators.issue.update({
id: 'issue-123',
title: 'New title'
})
)Mutator Names
Each Mutator has a mutatorName which is computed by defineMutators. When you run a mutator, Zero sends this name along with the arguments to your server to execute the server-side mutation.
console.log(mutators.issue.update.mutatorName)
// "issue.update"mutators.ts
By convention, mutators are listed in a central mutators.ts file. This allows them to be easily used on both the client and server:
import {defineMutators, defineMutator} from '@rocicorp/zero'
import {zql} from './schema.ts'
import {z} from 'zod'
export const mutators = defineMutators({
posts: {
create: defineMutator(
z.object({
id: z.string(),
title: z.string()
}),
async ({
tx,
context: {userID},
args: {id, title}
}) => {
await tx.mutate.post.insert({
id,
title,
authorID: userID
})
}
),
update: defineMutator(
z.object({
id: z.string(),
title: z.string().optional()
}),
async ({
tx,
context: {userID},
args: {id, title}
}) => {
const prev = await tx.run(
zql.post.where('id', id).one()
)
if (prev?.authorID !== userID) {
throw new Error(`Access denied`)
}
await tx.mutate.post.update({
id,
title,
authorID: userID
})
}
)
}
})You can use as many levels of nesting as you want to organize your mutators.
As your application grows, you can move mutators to different files to keep them organized:
// posts.ts
export const postMutators = {
create: defineMutator(
z.object({
id: z.string(),
title: z.string(),
}),
async ({tx, context: {userID}, args: {id, title}}) => {
await tx.mutate.post.insert({
id,
title,
authorID: userID,
})
},
),
}
// user.ts
export const userMutators = {
updateRole: defineMutator(
z.object({
role: z.string(),
}),
async ({tx, ctx: {userID}, args: {role}}) => {
await tx.mutate.user.update({
id: userID,
role,
})
},
),
}
// mutators.ts
import {postMutators} from 'zero/mutators/posts.ts'
import {userMutators} from 'zero/mutators/users.ts'
export const mutators = defineMutators{{
posts: postMutators,
users: userMutators,
})Registration
Before you can use your mutators, you need to register them with Zero:
import {ZeroProvider} from '@rocicorp/zero/react'
import type {ZeroOptions} from '@rocicorp/zero'
import {mutators} from 'zero/mutators.ts'
const opts: ZeroOptions = {
// ... cacheURL, schema, etc.
mutators
}
return (
<ZeroProvider {...opts}>
<App />
</ZeroProvider>
)Server Setup
In order for mutations to sync, you must provide an implementation of the mutate endpoint on your server. zero-cache calls this endpoint to process each mutation.
Registering the Endpoint
Use ZERO_MUTATE_URL to tell zero-cache where to find your mutate implementation:
export ZERO_MUTATE_URL="http://localhost:3000/api/zero/mutate"
# run zero-cache, e.g. `npx zero-cache-dev`Implementing the Endpoint
You can use the handleMutateRequest and mustGetMutator functions to implement the endpoint. Plug in whatever dbProvider you set up (see server-zql or the install guide).
// src/routes/api/zero/mutate.ts
import {createFileRoute} from '@tanstack/react-router'
import {handleMutateRequest} from '@rocicorp/zero/server'
import {mustGetMutator} from '@rocicorp/zero'
import {mutators} from 'mutators.ts'
import {dbProvider} from 'db-provider.ts'
export const Route = createFileRoute('/api/zero/mutate')({
server: {
handlers: {
POST: async ({request}) => {
const result = await handleMutateRequest({
dbProvider,
handler: transact =>
transact((tx, name, args) => {
const mutator = mustGetMutator(mutators, name)
return mutator.fn({
args,
tx
})
}),
request,
userID: null
})
return Response.json(result)
}
}
}
})handleMutateRequest accepts a standard Request and returns a JSON object which can be serialized and returned by your server framework of choice.
mustGetMutator looks up the mutator in the registry and throws an error if not found.
The mutator.fn function is your mutator implementation wrapped in the validator you provided.
Handling Errors
The handleMutateRequest function skips any mutations that throw:
const result = await handleMutateRequest({
dbProvider,
handler: transact =>
transact(async (tx, name, args) => {
// The mutation is skipped and the next mutation runs as normal.
// The optimistic mutation on the client will be reverted.
throw new Error('bonk')
}),
request: c.req.raw,
userID: null
})handleMutateRequest catches such errors and turns them into a structured response that gets sent back to the client. You can recover the errors and show UI if you want.
It is also of course possible for the entire push endpoint to return an HTTP error, or to not reply at all:
export const Route = createFileRoute('/api/zero/mutate')({
server: {
handlers: {
POST: async () => {
throw new Error('zonk') // will trigger resend
}
}
}
})If Zero receives any response from the mutate endpoint other than HTTP 200, 401, or 403, it will disconnect and enter the error state.
If Zero receives HTTP 401 or 403, the client will enter the needs auth state and require a manual reconnect. Use zero.connection.connect() for cookie auth or zero.connection.connect({auth: newToken}) for token auth, then Zero will retry all queued mutations.
If you want a different behavior, it is possible to implement the mutate endpoint yourself and handle errors differently.
Custom Mutate URL
By default, Zero sends mutations to the URL specified in the ZERO_MUTATE_URL parameter.
However you can customize this on a per-client basis. To do so, list multiple comma-separated URLs in the ZERO_MUTATE_URL parameter:
export ZERO_MUTATE_URL="https://api.example.com/mutate,https://api.staging.example.com/mutate"Then choose one of those URLs by passing it to mutateURL on the Zero constructor:
const opts: ZeroOptions = {
// ...
mutateURL: 'https://api.staging.example.com/mutate'
}URL Patterns
The strings listed in ZERO_MUTATE_URL can also be URLPatterns:
export ZERO_MUTATE_URL="https://mybranch-*.preview.myapp.com/mutate"For more information, see the URLPattern section of the Queries docs. It works the same way for mutations.
If you're configuring per-branch preview URLs (for example on Vercel), see Preview Deployments for the complete setup across both query and mutate endpoints.
Server-Specific Code
To implement server-specific code, just run different mutators in your mutate endpoint. Server authority to the rescue!
defineMutators accepts a baseMutators parameter that makes this easy. The returned mutator registry will contain all the mutators from baseMutators, plus any new ones you define or override:
// server-mutators.ts
import {defineMutators, defineMutator} from '@rocicorp/zero'
import {z} from 'zod'
import {zql} from 'schema.ts'
import {mutators as sharedMutators} from 'mutators.ts'
export const serverMutators = defineMutators(
sharedMutators,
{
posts: {
// Overrides the shared mutator definition with same name.
update: defineMutator(
z.object({
id: z.string(),
title: z.string().optional(),
priority: z.number().optional()
}),
async ({
tx,
ctx: {userID},
args: {id, title, priority}
}) => {
// Run the shared mutator first.
await sharedMutators.posts.update.fn({
tx,
ctx,
args
})
// Record a history of this operation happening in an audit log table.
await tx.mutate.auditLog.insert({
issueId: id,
action: 'update-title',
timestamp: Date.getTime()
})
}
)
}
}
)For simple things, we also expose a location field on the transaction object that you can use to branch your code:
const myMutator = defineMutator(async ({tx}) => {
if (tx.location === 'client') {
// Client-side code
} else {
// Server-side code
}
})Running Mutators
Once you have registered your mutators, you can invoke them with zero.mutate:
import {mutators} from 'mutators.ts'
zero.mutate(
mutators.issue.update({
id: crypto.randomUUID(),
title: 'New title'
})
)Waiting for Results
We typically recommend that you "fire and forget" mutators.
Optimistic mutations make sense when the common case is that a mutation succeeds. If a mutation frequently fails, then showing the user an optimistic result isn't very useful, because it will likely be wrong.
That said there are cases where it is nice to know when a write succeeded on either the client or server.
One example is if you need to read a row directly after writing it. Zero's local writes are very fast (almost always < 1 frame), but because Zero is backed by IndexedDB, writes are still technically asynchronous and reads directly after a write may not return the new data.
You can use the .client promise in this case to wait for a write to complete on the client side:
const write = zero.mutate(
mutators.issue.insert({
id: crypto.randomUUID(),
title: 'New title'
})
)
// issue-123 not guaranteed to be present here. read1 may be undefined.
const read1 = await zero.run(
queries.issue.byId('issue-123').one()
)
// Await client write – almost always less than 1 frame, and same
// macrotask, so no browser paint will occur here.
const res = await write.client
if (res.type === 'error') {
console.error('Mutator failed on client', res.error)
}
// issue-123 definitely can be read now.
const read2 = await zero.run(
queries.issue.byId('issue-123').one()
)You can also wait for the server write to succeed:
const write = zero.mutate(
mutators.issue.insert({
id: crypto.randomUUID(),
title: 'New title'
})
)
const clientRes = await write.client
if (clientRes.type === 'error') {
throw new Error(
`Mutator failed on client`,
clientRes.error
)
}
// optimistic write guaranteed to be present here, but not
// server write.
const read1 = await zero.run(
queries.issue.byId('issue-123').one()
)
// Await server write – this involves a round-trip.
const serverRes = await write.server
if (serverRes.type === 'error') {
throw new Error(
`Mutator failed on server`,
serverRes.error
)
}
// issue-123 is written to server and any results are
// synced to this client.
// read2 could potentially be undefined here, for example if the
// server mutator rejected the write.
const read2 = await zero.run(
queries.issue.byId('issue-123').one()
)If the client-side mutator fails, the .server promise is also rejected with the same error. You don't have to listen to both promises, the server promise covers both cases.
Permissions
Because mutators are just normal TypeScript functions that run server-side, there is no need for a special permissions system. You can implement whatever permission checks you want using plain TypeScript code.
See Permissions for more information.
Dropping Down to Raw SQL
The ServerTransaction interface has a dbTransaction property that exposes the underlying database connection. This allows you to run raw SQL queries directly against the database.
This is useful for complex queries, or for using Postgres features that Zero doesn't support yet:
const markAllAsRead = defineMutator(
z.object({
userId: z.string()
}),
async ({tx, args: {userId}}) => {
// shared stuff ...
if (tx.location === 'server') {
// `tx` is now narrowed to `ServerTransaction`.
// Do special server-only stuff with raw SQL.
await tx.dbTransaction.query(
`
UPDATE notification
SET read = true
WHERE user_id = $1
`,
[userId]
)
}
}
)See ZQL on the Server for more information.
Notifications and Async Work
The best way to handle notifications and async work is a transactional outbox. This ensures that notifications actually do eventually get sent, without holding open database transactions to talk over the network. This can be implemented very easily in Zero by writing notifications to an outbox table as part of your mutator, then processing that table periodically with a background job.
However sometimes it's still nice to do a quick and dirty async send as part of a mutation, for example early on in development, or to record metrics. For this, the createMutators pattern is useful:
// server-mutators.ts
import {defineMutator} from '@rocicorp/zero'
import z from 'zod'
import {zql} from 'schema.ts'
import {mutators as clientMutators} from 'mutators.ts'
// Instead of defining server mutators as a constant,
// define them as a function of a list of async tasks.
export function createMutators(
asyncTasks: Array<() => Promise<void>>
) {
return defineMutators(clientMutators, {
issue: {
update: defineMutator(
z.object({
id: z.string(),
title: z.string()
}),
async (tx, {id, title}) => {
await tx.mutate.issue.update({id, title})
asyncTasks.push(() => sendEmailToSubscribers(id))
}
)
}
})
}Then in your mutate handler:
export const Route = createFileRoute('/api/zero/mutate')({
server: {
handlers: {
POST: async ({request}) => {
const asyncTasks: Array<() => Promise<void>> = []
const mutators = createMutators(asyncTasks)
const result = await handleMutateRequest({
dbProvider,
handler: transact =>
transact((tx, name, args) => {
const mutator = mustGetMutator(mutators, name)
return mutator.fn({
tx,
args
})
}),
request,
userID: null
})
// Run all async tasks
// If any fail, do not block the response, since the
// mutation result has already been written to the database.
await Promise.allSettled(
asyncTasks.map(task => task())
)
return Response.json(result)
}
}
}
})Custom Mutate Implementation
You can manually implement the mutate endpoint in any programming language.
This will be documented in the future, but you can refer to the handleMutateRequest source code for an example for now.